
The Birch Bark Wall Art Post: (This might get epic)
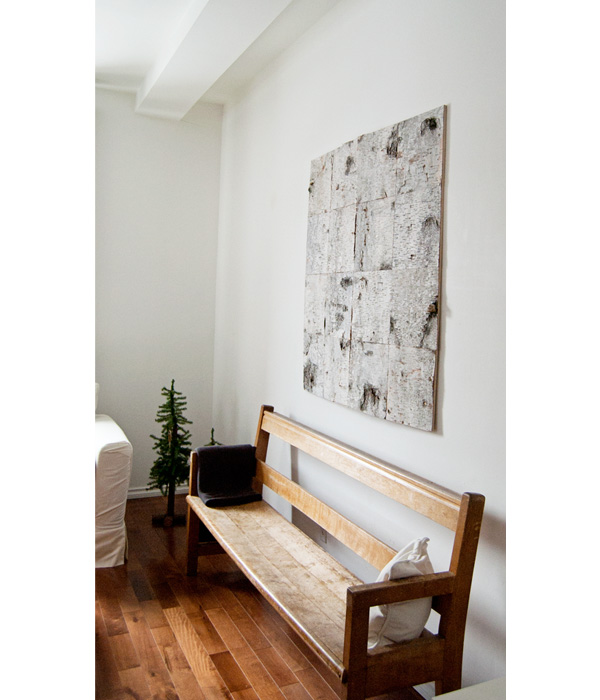
I can't begin this post without paying tribute to the artist who created the original Tuohi (Birch Bark) Wall Element, designer Tapio Anttila for Showroom Finland. I first saw this piece at John and Juli's shop Mjölk in Toronto and absolutely fell in love with it. Big Chuck and I love to have natural elements in our home, and this modern and clean piece with it's warmth, texture and grand size certainly left an impression on me.
I never thought that I would have the chance to have my very own Tuohi Wall Element - let alone undertake one as a DIY project. The occasion presented itself perfectly however, when after visiting Mjölk on the Thanksgiving long weekend Big Chuck and I arrived at the cottage to find a recently felled birch tree, bark intact. My dad gave us the go ahead to harvest as much bark as we like and at the end of the weekend we brought a big bag home with us.
And so the project began.
Here's what we needed to get this job done:
• two 2' x 4' 1/2" plywood pieces (we would have bought 4' x 4' but our car wasn't big enough to get that home)
• brass plated mounting hardware, wood screws and airplane wire
• X-acto knife
• ruler and/or template
• cutting surface (we cut on the plywood)
• birch bark removed from 13" - 15" logs (we used about 14 different pieces/logs)
• carpenter's glue
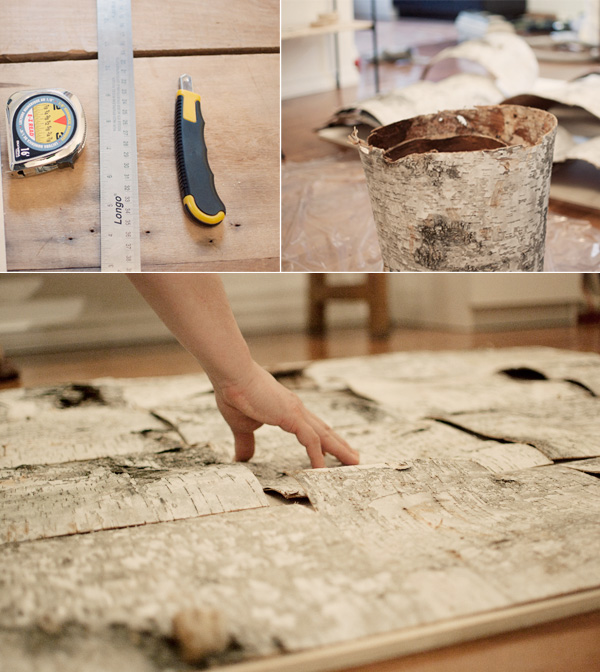
We began by cutting out a 12" x 12" cardboard template that we could use to estimate how many tiles we could get out of each piece of birch bark. Some yielded two, most only one. You have to account for variation in surface texture, holes and the like. After selecting all the best pieces I began cutting out our 12" x 12" tiles, 16 to be exact. As you may have guessed, birch bark is a tricky material to work with, it was difficult to measure accurately because it isn't flat. If I could give you a tip I would suggest that you steam the pieces (which we did after they were cut) first.
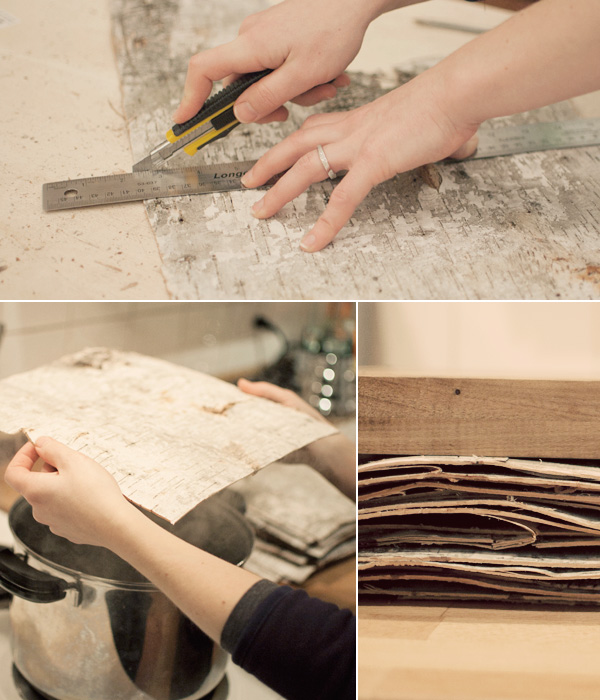
Once all the tiles were cut, we steamed them over a pot of boiling water. This method worked nicely and we ended up with relatively flat pieces. Now comes the fun part, placing them on the plywood. We played around with different locations, alternating between light and dark, more textured pieces and less. When we were satisfied with our results we started at one end of the plywood and began glueing. Don't be shy with the glue! We glued one to two pieces at a time, weighing them down with heavy objects and leaving them for at least 30 minutes before moving on to the next pieces. This is when I realized this project wasn't going to be done that night.
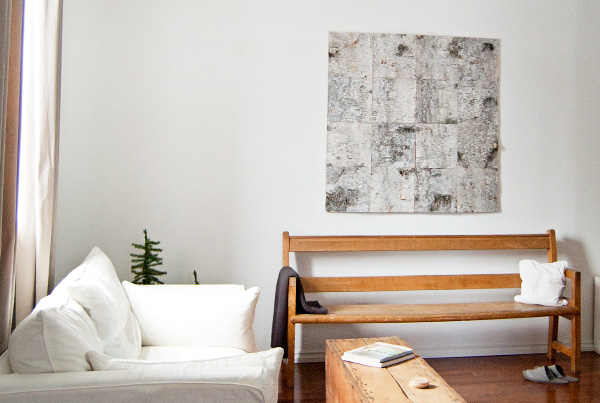
Over the course of the next week we slowly glued all our tiles down and trimmed any edges that weren't perfect. Big Chuck attached the two pieces of ply wood side by side using a piece of wood and attached the mounting hardware to the back. Using our trusty stud finder we located a stud in the exact place (lucky!) that we wanted to hang our birch bark wall art, and... voilà!
It makes me happy every time I look at it, and adds a lovely warmth to our home.
Have a wonderful Tuesday!
xo bess
It's so wonderfully gorgeous! I love working on projects with the hubby...this looks like a good one to try out! We've needed a headboard for awhile now!
ReplyDeleteLOVE!!! From the beautiful how-to photos to the gorgeous finished product. I love this. Beautiful job guys!! xo
ReplyDeletewow, it looks beautiful! i love it, it looks like that space in your home was just waiting for this piece. perfect :)
ReplyDeleteBEAUTIFUL!!!! Works perfectly in the space.
ReplyDeleteLove this Bess, a perfect piece of nature which has now become a piece of art. STUNNING!!!!!
ReplyDeleteSO amazing. I just love it - you guys did an incredible job. I am going to be scouring for a birch tree (not easy to come by in Toronto). :)
ReplyDeleteThanks so much everyone!!
ReplyDeleteEmeline - we also thought about using the birch bark for a headboard but wondered about it's delicate nature and getting little pieces of birch bark in bed :/ Let me know if you decide to do it - would love to see those photos!
wow, this is simply perfect!
ReplyDeleteif I have enough energy (!!!), I might try this project (we have access to birch trees).
good job! i'm so impressed. wish i had some birch bark lying around...
ReplyDeleteI never would have imagined that bark could turn out so beautiful as artwork! I love it! Now to find me some birch trees!
ReplyDeleteWow! Super beau résultat et surtout belle idée!
ReplyDeleteholy wow! amazing, bess, truly.
ReplyDeleteI never thought you'd turn them into wall art! It's beyond beautiful. And nice place... so breezy and clean :)
ReplyDeleteAhh!! So this is the mysterious birch bark project.. I thought you were making a canoe! ;) It looks really great and it's so unique. And what a fun project to do together!!
ReplyDeletePokój Tobie! Jeśli pragniesz uwolnić się od przeszłości i radować się życiem ucz się i przestrzegaj prawo. Miłego dnia!
ReplyDeleteAmazing!! What a great job you did!
ReplyDeleteit's gorgeous! LOVE that bench too!!
ReplyDeleteIt'a great project and it gives the room a lot of warmth. I should hang it really high on the wall, otherwise my cats could think it's to get their manicure done...
ReplyDeleteOh my gosh, this is BRILLIANT!!! Seriously, it's gorgeous. You did a fantastic job!
ReplyDeleteoxo
This is truly something Bess! Wow. How much would I have to pay you to make one for my home?!!! Wow. Wow. and more Wows. In love.
ReplyDeletetoo awesome!!
ReplyDelete~Steller!
ReplyDeleteI think this is going on my list of things to try
From Quebec, I made one too ! not excatly like yours because the birch I had was not in perfect condition so I couldn't same-sized square but, in the end, my patchwork turned out looking very good on the mantle of our gaz fireplace for Christmas. Hope I could post a picture here so you could see !
ReplyDeletealways thought this was great - blogged about it! great work - kudos!
ReplyDeleteI also feel in love with the piece at mjolk... and in the hunt of how to diy it, I found your post! Thanks!
ReplyDelete